DIY Puppet and Shadow Puppet Theater

DIY Puppet Theater with Folkmanis Puppets

This DIY Puppet Theater can convert into a Shadow Puppet Theater as well
I discovered Shadow Puppets and tried searching for instructions on how to make a DIY Shadow Puppet Theater. After combing the internet, I couldn’t find what I was looking for and came up with the idea to make a Shadow Puppet theater with a removeable frosted screen so that kids could also turn it into a Puppet Theater. I have always LOVED Folkmanis puppets and the creativity they inspire.

Folkmanis puppets are so life-like, easy to use and a favorite gift idea in our household!
I do not have a saw, so I set out to meet some neighbors that I had seen working with a saw previously. They have been incredibly gracious to help me and I have quite enjoyed making two new friends in the neighborhood!

It doesn’t fold exactly flat, but I like the longer side panels for stability. If you wanted it to fold EXACTLY in half, you could change the ratios so the main panel is 24” and the sides are 12", but I think it would be a bit less stable.

Each performer has a mirror to check their appearance before showtime and the frosted Plexiglass is removeable to convert from a shadow puppet theater to a puppet theater.

The Performers can easily remove the Frosted Plexiglass to convert the Shadow Puppet Theater into a Puppet Theater.

This is what it looks like after removing the Plexiglass so it can be used as a Puppet Theater.

After you pop off the plexiglass/plastic, you can use as a regular puppet theater.
SUPPLIES LIST:
Wood: 1/2” x 2’ x 4’ Birch Plywood from Home Depot (found in Lumber aisle under “Project Panels”) $28.35.
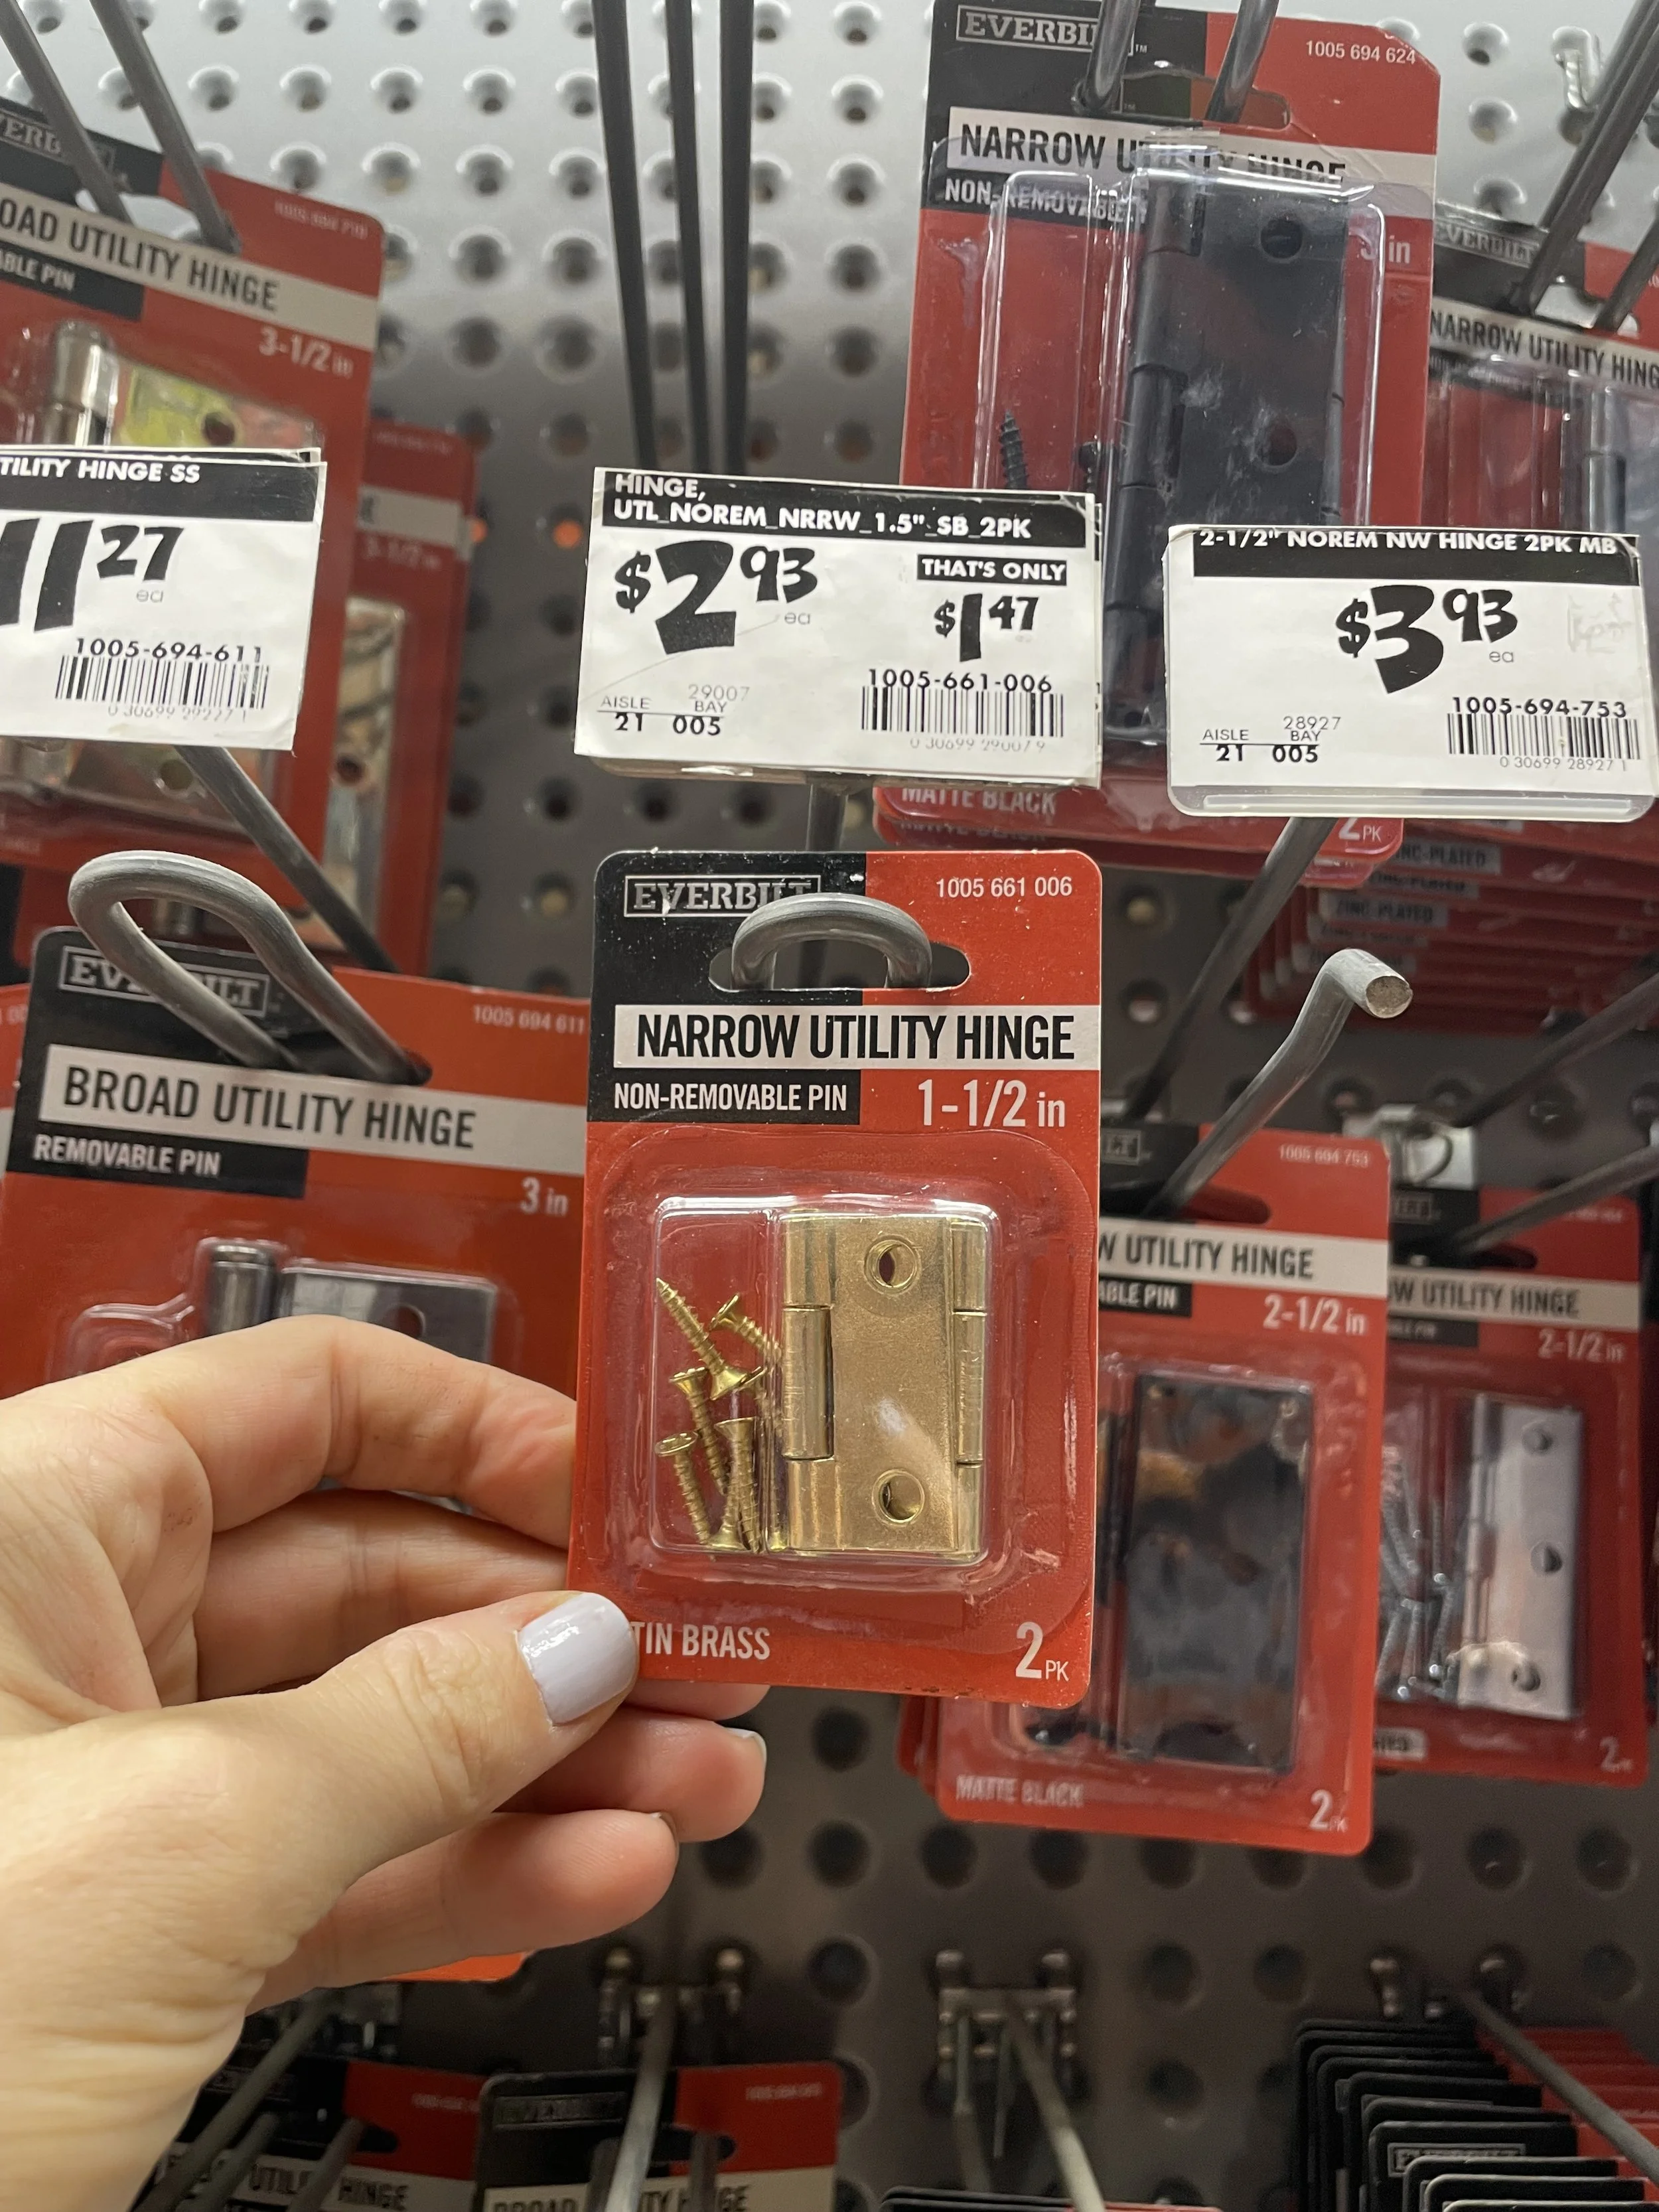
Hinges: (2 hinges for $2.93, need 2 packs) 1.5 in. Satin Brass Non-Removable Pin Narrow Utility Hinge (2-Pack)
Screws: need shorter screws than the hinges comes with: Need #4 x 3/8” $1.50.
Sand Paper
Paint: Home Depot is the only place I can find sample sizes of high quality paint in any color I want. I used Semi Gloss in Saffron Sands and Dash of Curry for $6.98 each. I bought a Quart of the white (Sweet Coconut Milk).
High Density Foam roller $5.98
Plastic Mini Roller Tray $1.68
Blue Painters Tape to paint stripes if you like that design
I had a paint brush already
Acrylic 8” Mirrors ($15.99 for a pack of 6)
TOTAL: $80.40 (not including saws)
Folkmanis Hand Puppets (can buy directly from them or Amazon, Barnes and Noble)
Table Saw used for straight cuts, $35 Jig Saw used to cut the rounded square in the center panel. I don’t have a saw and noticed my neighbor using one. I went over and knocked on the door, introduced myself and asked for help one day. I offered to pay for the help and they declined (although I do bring over cookies from time to time). I’ve been really touched by their help with my projects and it has built a sense of community for me.
OPTIONAL: SUPPLIES TO CONVERT TO A SHADOW PUPPET THEATER:
Custom Cut plastic 16” x 18” from Tap Plastics (about $25).
Velcro ($13.99)
Plastic cup to hold the Shadow Puppets on sticks ($0.99 from Target)
Head lamps ($9.99 for 2)
TOTAL: $49.97
Shadow puppets ($17 for a themed set from Etsy)

You need one Birch Plywood Board that is 1/2” thick and 2’ x 4’ wide/long.

You can find the wood in the Lumber Aisle in the section called “Project Panels.”
You need 2 sets of hinges (4 total).

You need one pack of shorter screws than what the hinge set comes with.

You can pick ANY colors you want and have samples made for Behr paint at Home Depot! I used the Semi Gloss finish.

High density foam roller makes a very smooth finish.

you can roll the paint out in a disposable tray. You may want to get 2-3 if you would like to do multiple colors (like for the stripes).

My neighbor did all the cuts for me but says he used this Jig Saw to do the more complicated rounded square from the middle board.

These were perfect to apply the two pieces stuck together to the board, then place the plexiglass to apply.

These stick-on mirrors are optional but a great addition so the performers can check their appearance before the big show!
MAKING THE BOARDS:
Cut the Birch Boards to the below specifications. My neighbor used a Jig Saw to cut the rounded square from the main panel.
Paint the panels in whatever design you like (or feel free to copy mine!) with the high density foam roller. The side panels are 4.33” stripes that I taped off with blue tape to paint. Once dry, I painted the middle stripe. I folded cardstock in half to cut a rounded edge to trace for the design across the top of the main board. Once totally dry, trace the mirror on the back and you can paint a little border around the mirror.
Once paint is COMPLETELY dry, attach the hinges with the shorter screws. Follow instructions on the hinges to pre drill holes for screws.
Place the velcro in pairs on the board around the perimeter. remove the sticker and place the frosted plexiglass in place, then hold according to package instructions to attach.
Peel the sticker off the back and attach the mirrors to the backs of the panels.
You can attach a plastic cup with velcro under the mirror to hold the shadow puppets.
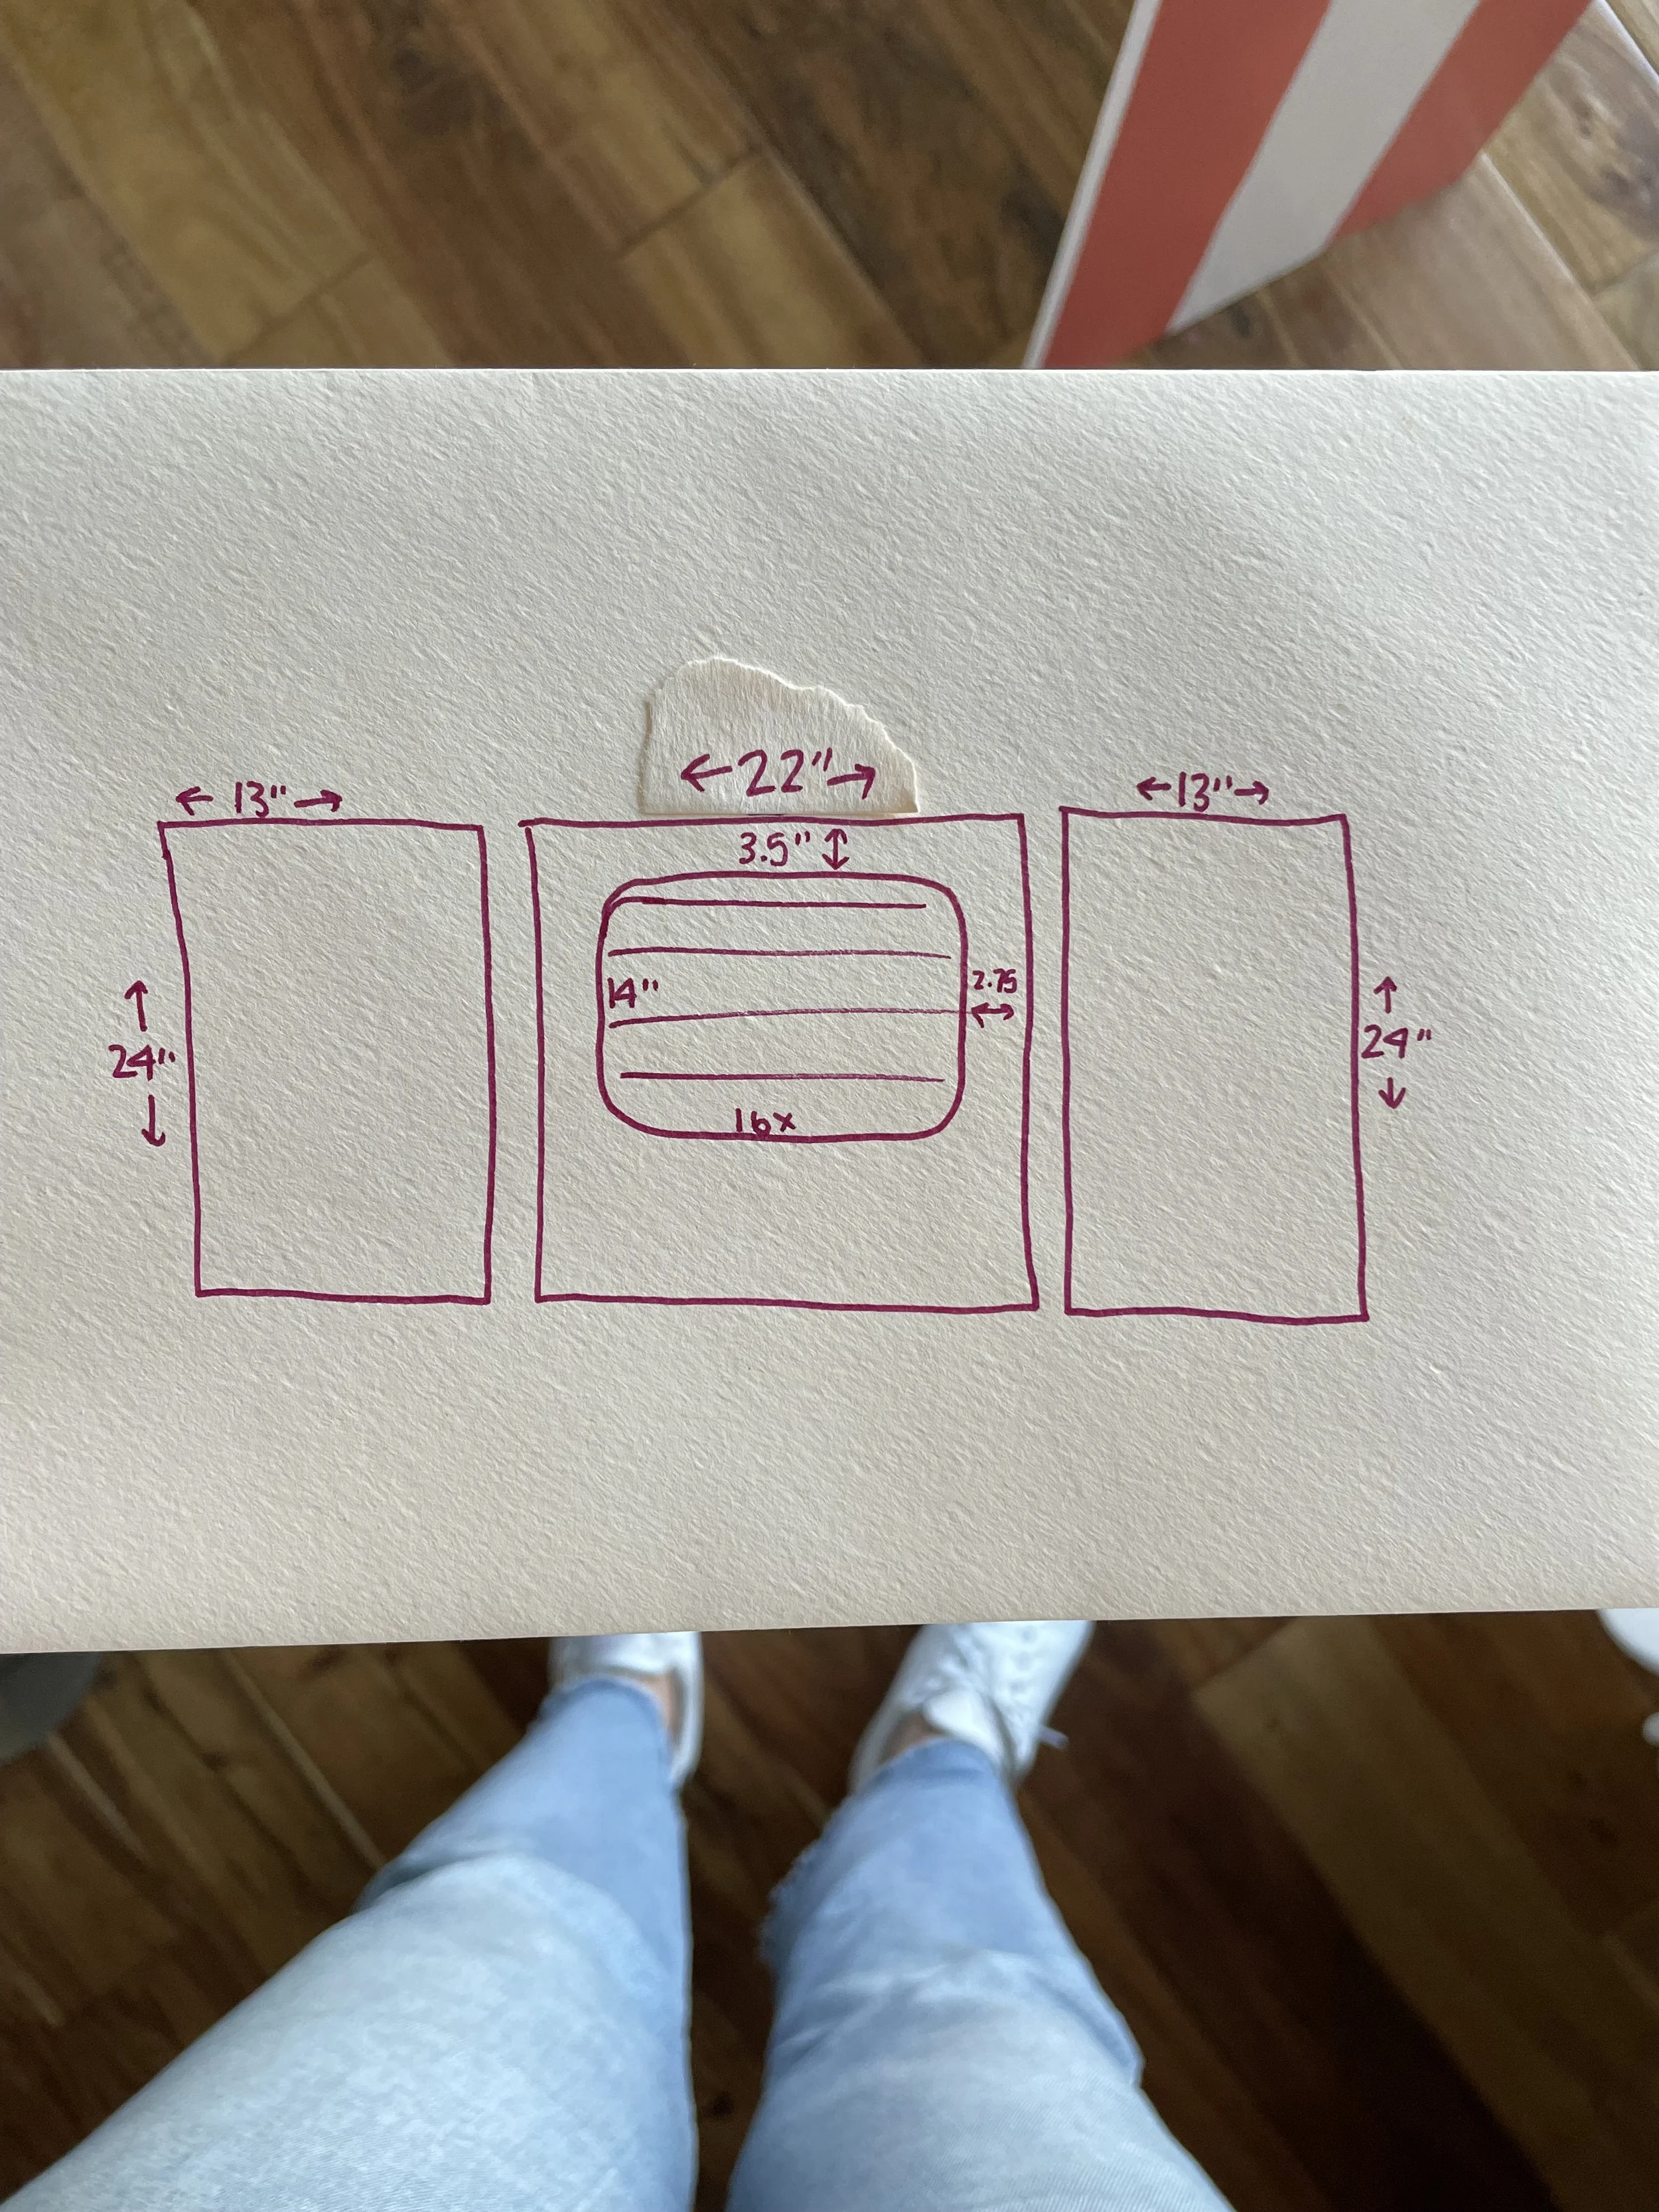
Cut the Birch Boards to the above specifications with a table saw for straight cuts and Jig Saw for the rounded square out of the middle.

I used cardstock folded in half to trace the design for the center panel.


Close up photo of the 1.5” hinge with the shorter 3/8” #4 screws (purchased separately). Also note which direction to screw on the hinge because I attached the wrong way the first time.
I hope you try this project and the little ones (and you!) have endless hours of laughs, fun, and imaginative play!


This DIY Puppet Theater can convert to a Shadow Puppet Theater